
Digital cameras these days come with such high specs that your photos are likely too large to insert on the pages of your website.
When displaying images to your website, we recommend they are approx. 800 x 600 pixels
Why are smaller images better for the web?
- they load quickly – large images have large file sizes, whereas smaller images have a smaller filesize so they are downloaded on your screen quicker
- they fit on the screen – there is nothing worse than seeing a gigantic picture on the screen and only being able to view small portions of the image before scrolling to see the rest of it. Resize your image so that visitors can see the full image on their computer screen. We recommend resizing your images to 800 x 600 pixels (see instructions below).
How to Resize an Image in WordPress
Note: suitable for when you are only uploading one or two images. If you are uploading to a gallery please see the next section below.
- Open the image you wish to edit – by going into Media -> Library

01 – Media Library
- Find the image you wish to edit – for this example I have uploaded a very large image of a forest with autumn leaves. Click to ‘Edit’ the image.

Step 2 – locate your image
- As you can see, my image of the forest is 4288 x 2484 pixels – this is much too large for displaying on my website so I will resize the image. Click on the ‘Edit Image’button.

Step 3 – edit the image
- In the Edit Image screen, you have the option to rotate, flip, crop and scale your image. We are going to use the ‘Scale Image’feature

Step 4 – image details and editing options
- Click the ‘Scale Image’ button to show all the options.

Step 5 – Scale Image
- Update the largest number to in the dimensions to 800 – the other number will automatically update to keep aspect ratio of the image.

- Click the ‘Scale’button to save your new dimensions.

Saved


How to Resize Multiple Images (for a Gallery)
Using MS Paint
- Open up Microsoft Paint
- Open the image you wish to resize
- Click the Resize button in the toolbar
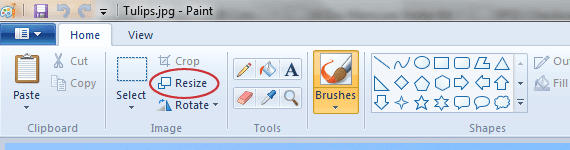
Click the Resize button
- A box will pop up with your options.
- Select Pixels (instead of Percentage) – this will change the figures to display the actual pixel dimensions of your image.
- Ensure the Maintain Aspect Ratio button is checked
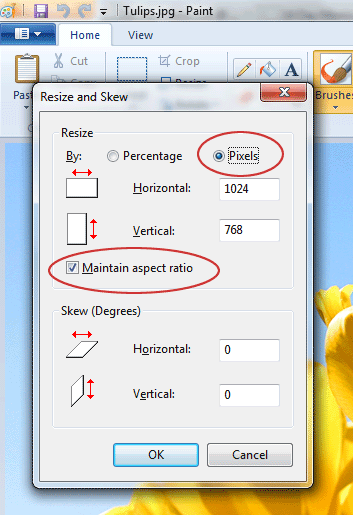
Resize Options
- Determine which dimension is the biggest e.g. which number is higher, horizontal or vertical?
- If Horizontal is the highest number, change this to 800 pixels (the vertical figure should automatically update)
- If Vertical is the highest number, change this to 600 pixels (the horizontal figure should automatically update)
- In this image, the Horizontal number of 1024 is higher so I will change that one to 800.
- As you can see, the Vertical figure has automatically updated to 600 – this means that my image will keep it’s proportions and will not look squashed or distorted. Note: your image ratio may be different to this example so the Vertical figure will not always update to 600)
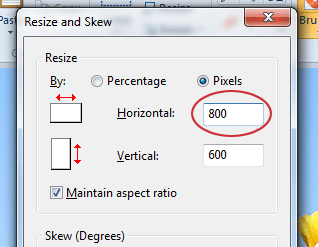
Update your dimensions
- Save your image.
- Your image is now ready to upload to your website.
Other Recommended Software
You can also use Pixlr.com to resize images. We recommend the Express option for simple image editing.

Comments are closed.